

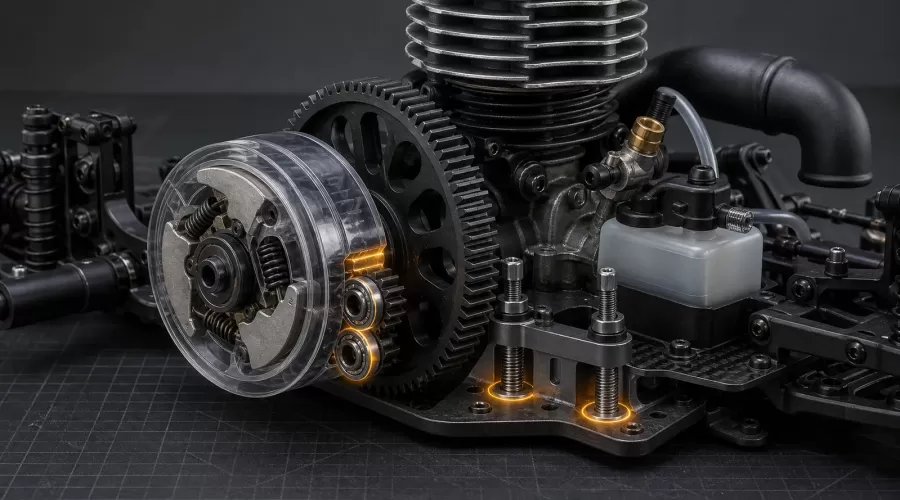
Quick answer: A stripped spur gear is evidence of a drivetrain problem, not a diagnosis by itself. Disable the engine, then check four separate interfaces: the centrifugal clutch must release at idle and engage as speed rises; the clutch bell must rotate freely on sound bearings; the clutch-bell gear and spur must have the model-specified pitch, alignment and backlash; and the engine mount must stay square and tight under load. Replace damaged teeth before testing. Set mesh by the exact vehicle manual, rotate the full gear set by hand to find tight spots, and investigate bearing play, bent shafts, loose mounts or driveline binding before fitting a harder gear.
Key principle: repeated tooth failure usually means the original cause is still present. A metal spur gear can move the failure into a clutch bell, bearing, shaft or transmission; it cannot correct pitch, alignment, runout or a moving engine mount.
How does a nitro RC centrifugal clutch work?
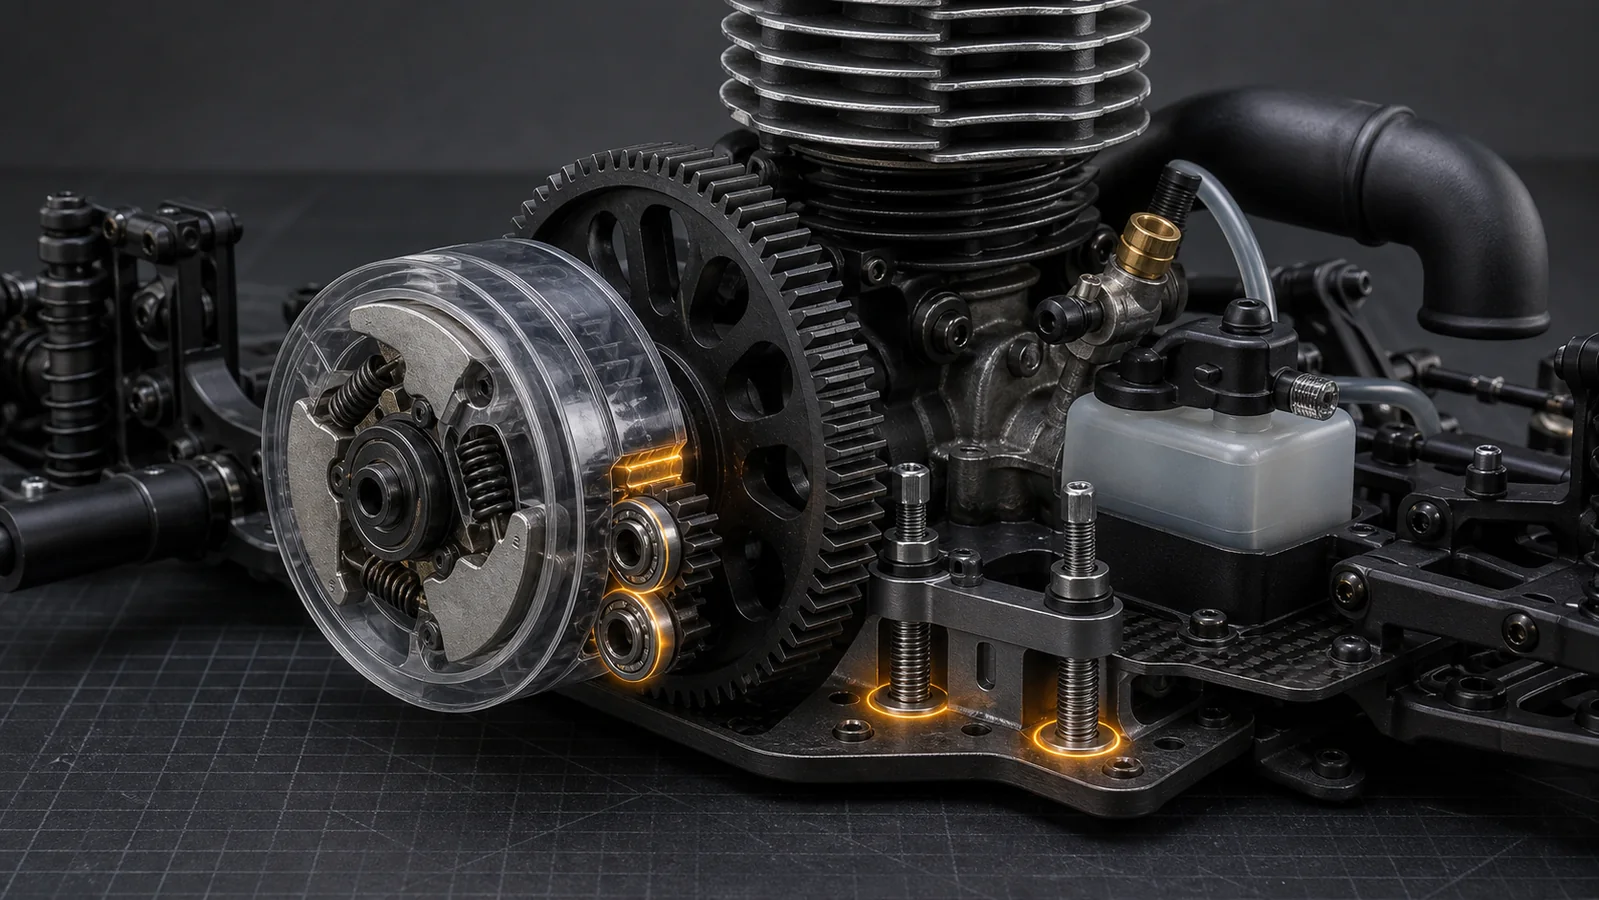
A typical nitro RC clutch sits on the engine crankshaft. Two, three or four shoes pivot or move outward against springs. At idle, spring force should hold the shoes away from the inside of the clutch bell so the bell and drivetrain can remain nearly stationary. As crankshaft speed rises, the shoes move outward, contact the bell and transmit torque through the bell's small gear to the larger spur gear. The spur then drives the transmission or center differential.
That description creates five diagnostic zones:
- Engine and flywheel: the crankshaft, collet, flywheel and nut establish the clutch's running axis.
- Shoes and springs: their material, orientation and spring rate control when and how engagement occurs.
- Clutch bell and bearings: the bell must run concentrically and freely when the shoes are released.
- Bell-to-spur interface: pitch, lateral alignment, center distance and backlash determine tooth contact.
- Mount and driven system: the engine mount, chassis, spur shaft, slipper, center differential and transmission must stay aligned without binding.
This separation matters because similar symptoms can come from different zones. Wheels turning at idle may indicate a broken or incorrectly installed clutch spring, shoes dragging inside the bell, a bell bearing that no longer releases, or simply excessive idle speed. A high-revving engine with weak acceleration can indicate slipping shoes or a slipper setting, but it can also be an engine-tuning problem. Use the carburetor-tuning guide only after the mechanical clutch path has been checked.
When should you stop running the RC car immediately?
Stop the engine when teeth are missing or folded, the clutch bell visibly wobbles, the spur runs out sideways, the bell becomes unusually hot, the drivetrain squeals or binds, the car tries to move at a safe idle, an E-clip or retaining screw is missing, metal or plastic debris appears around the mesh, or the engine mount shifts after a short run. Continuing can erase the evidence that identifies the root cause and can turn a low-cost spur failure into bearing, crankshaft or transmission damage.
Before inspection, shut off the engine, close the fuel supply as the manual directs, disconnect any electric starter system and let the engine, exhaust and clutch cool. Place the model on a stable stand with the driven wheels clear. Do not touch a rotating clutch bell or spur, and do not test with loose clothing, hair or tools near the drivetrain. If the engine also resists cranking, use the starter-system torque-path guide instead of forcing the clutch bell.
Nitro RC clutch-bell and spur-gear symptom table
| Observed symptom | Most useful interpretation | First safe check | What it does not prove |
|---|---|---|---|
| Spur teeth stripped around the full circumference | Mesh may have been too loose, the engine may have shifted, or tooth pitch may be incompatible | Replace the damaged gear, then verify pitch, mount security and full-rotation mesh | That a metal spur is the correct repair |
| Damage concentrated in one sector | Runout, a bent shaft, off-center spur, damaged bearing or chassis/mount distortion is plausible | Rotate slowly and measure or observe the tight and loose positions | That average backlash is acceptable |
| Gears feel tight and become hot | Center distance may be too small, axes may not be parallel, or a bearing/driveline may bind | Remove engine power and check free rotation through 360 degrees | That tighter mesh is safer |
| Bell wobbles or scrapes | Bearing wear, missing shims, wrong bell, bent pilot shaft or incorrect retention is plausible | Inspect radial play, axial play and model-specific shim order | That the clutch shoes are worn |
| Wheels turn at a correct low idle | Shoes may drag; a spring may be broken or installed incorrectly; the bell bearing may bind | Stop the engine and verify bell free-spin plus shoe/spring condition | That the low-speed needle must be changed |
| Engine revs but car accelerates poorly | Clutch or slipper slip is possible, but tune and driveline faults can imitate it | Check mechanical engagement, slipper setting and drivetrain before tuning | That stronger springs or heavier shoes are required |
| New spur strips again after a few minutes | The root cause was not removed | Audit mount movement, pitch, bearings, shaft runout, impact damage and downstream binding | That the replacement gear was defective |
A controlled clutch and drivetrain inspection workflow
- Freeze the configuration. Record vehicle, engine, flywheel, shoe, spring, clutch-bell, bearing, spur and slipper or center-differential part numbers. Photograph shim order before disassembly. Do not assume two parts are compatible because they fit on the same shaft.
- Preserve the failure evidence. Do not file teeth, sand the bell, wash bearings or discard broken springs until tooth wear, debris location and fastener condition have been documented.
- Separate the engine from the driven system. With the engine unable to start, establish whether the clutch bell can rotate freely at rest and whether the transmission rotates without a repeating tight spot.
- Inspect retention and axis. Check the crank pilot, collet, flywheel seating, nut, bell bearings, shims, cap screw or clip, engine-mount screws and chassis slots against the manual.
- Inspect the clutch. Look for broken, stretched or misplaced springs; cracked, glazed or unevenly worn shoes; shoe edges scoring the bell; heat discoloration; and debris inside the bell.
- Inspect both gears as a pair. A new spur running against a burred, hooked or chipped bell gear can be damaged immediately. Verify matching pitch or module and approved tooth-count combinations.
- Check alignment through a full revolution. Rotate the bell and spur slowly. The amount of play should not disappear at one position and become excessive at another. A repeating change points toward eccentricity, bearing play, shaft runout or an off-center gear.
- Check the mount under realistic handling. Tighten fasteners only to the maker's procedure and specified thread-lock instruction. Recheck after gently loading the chassis by hand; a cracked mount or damaged slot can move even when the screws feel tight.
- Change one approved variable. Replace or adjust only one confirmed item, rotate by hand again, then perform the shortest manual-approved test. Stop at the first rise in noise, heat, debris or movement.
Vibration is a common bridge between zones: a loose or imbalanced engine can shift the mesh, while damaged gear teeth can create new vibration. If fasteners repeatedly loosen or the spur visibly oscillates, follow the model-engine vibration and bearing guide before installing another gear.
How do you set and verify nitro RC gear mesh?
There is no universal paper thickness or backlash number for every nitro vehicle. Traxxas specifies approximately 0.1 mm copy paper for its nitro gear-mesh support procedure. HPI's general maintenance guide describes folding paper once for its nitro guidance. Losi manuals describe their own folded-paper or thin-card procedure, while current Team Associated race-kit instructions give model-specific clutch-bell shimming and axial-play values. These differences are the reason to begin with the exact vehicle manual.
When the manual approves a paper method, treat it as a starting fixture, not the final proof:
- Fit undamaged, explicitly compatible gears and all specified bearings, shims and retainers.
- Loosen the engine mount only enough for controlled movement. Keep the engine axis square to the driven shaft.
- Place the manual-specified paper or gauge between the mating teeth and move the engine toward the spur without forcing the paper deep into the roots.
- Tighten mount screws progressively so the engine does not twist. Use thread-lock only where and in the grade the maker specifies; keep it out of bearings.
- Remove the paper, rotate the complete gear pair through at least one full revolution and feel for free movement, slight play and no binding.
- Check lateral tooth overlap. The faces should engage as the manual shows; a bell pushed too far forward or rearward can have acceptable backlash but poor face contact.
- Recheck after the first brief test and after any impact, engine removal or gear replacement.
Do not judge only by sound. A noisy drivetrain can include transmission, differential, brake or bearing noise, and a quiet mesh can still be misaligned. Visual tooth contact, consistent free rotation, stable fasteners and model-specific part matching are stronger evidence.
Why does the spur gear keep stripping?
Repeated failure is best diagnosed by the wear pattern and by what changed immediately before it:
- Uniformly shaved teeth: check excessive backlash, wrong pitch, an engine that moved away from the spur, or a bell gear with damaged tooth form.
- Melted or smeared plastic: check tight mesh, bearing drag, slipper heat and downstream binding. Frictional heat can soften a gear before the teeth disappear.
- One damaged arc: check spur eccentricity, bent shafts, bell-bearing play, flywheel seating and chassis distortion.
- Chipped teeth after a crash: inspect engine mounts and chassis before replacing the gear. Traxxas documents impact-shifted engines and broken mounts as spur-damage causes on specific vehicles.
- Damage after a ratio change: verify the new tooth count is approved, the pitch or module matches, the engine was repositioned and the full range clears surrounding parts.
- Failure after clutch service: verify spring orientation, shoe direction, shim order, bearing seating and bell free-spin before suspecting carburetion.
Do not immediately substitute steel for plastic. Some designs use a replaceable polymer spur as a lower-cost sacrificial component. A harder gear may preserve its own teeth while transferring impact or misalignment load to the bell, bearings, shaft or transmission. Change material only when the manufacturer lists the conversion and the matching bell, pitch, slipper and maintenance procedure.
How do you diagnose shoes, springs and clutch-bell bearings?
Clutch shoes and springs
Shoes should be the specified material and orientation, and every spring should sit in its intended groove without protruding into the bell. A broken or weak spring can let one shoe contact early, making the model creep at idle and loading the bell unevenly. A spring installed backward can also prevent free movement. Uneven glazing or one shoe worn much more than the others suggests asymmetric contact, contamination, incorrect assembly or bell runout.
Do not mix shoe materials or spring rates unless the clutch system's instructions permit the combination. Engagement changes affect heat, launch behavior and engine load. Race setups are not universal service fixes. Team Associated's RC8B4.2 manual, for example, specifies an exact shoe-and-spring order for that four-shoe clutch; the values and order belong to that clutch, not every nitro RC car.
Clutch bell and bearings
With shoes released and the engine disabled, the bell should rotate as the manual describes without gritty feel, sticking or visible wobble. Inspect both bearings, their seats, spacers and shims. Radial looseness changes the tooth center distance while the gears rotate. Incorrect axial shimming can move the bell out of face alignment or clamp the bearings so the bell drags.
SKF's bearing-failure guidance identifies lubrication, contamination, incorrect mounting and overload among recurring root-cause categories for rolling bearings. That general engineering framework is useful, but the remedy remains model-specific: a shielded clutch-bell bearing may have a different service rule from a sealed bearing. Do not flush, repack or oil it unless the vehicle or bearing instructions allow it. Replace a rough, loose, corroded, heat-discolored or seized bearing with the exact approved size and specification.
Do pitch, tooth count and gear material have to match?
Yes, but “match” has several layers. The bell gear and spur must share the same tooth system, such as the specified pitch or module. Tooth count changes ratio and usually changes the engine position required for correct center distance. Face width and lateral position must provide intended tooth overlap. Bore, bearing, crank pilot, shim and retaining dimensions must also match the clutch assembly.
Do not infer compatibility from diameter or a seller phrase such as “fits .18 nitro.” Use the vehicle's exploded diagram and part list. The VRX RH1006 nitro buggy, HSP 94122 nitro buggy and HSP 94166 nitro buggy are useful examples of complete vehicles whose clutch and transmission parts must be matched to their own configurations. A standalone VRX VX18 engine does not by itself determine the clutch bell, spur, chassis clearance or ratio in every installation.
Use the RC engine models collection and starting and ignition accessories collection for discovery, then verify the exact vehicle and engine documentation before purchase. If the complete configuration is unknown, record compatibility as UNKNOWN - verify with the vehicle manufacturer.
Facts, inferences and unknowns
- Fact: official Traxxas, HPI, Team Associated and Losi instructions use model- or family-specific mesh, mounting, shimming and clutch procedures.
- Fact: both excessively tight and excessively loose mesh can shorten gear life; free rotation and controlled play must be checked after adjustment.
- Fact: changing clutch-bell tooth count requires the mesh to be reset on the Losi model documented in its manual.
- Inference: a spur that fails in one sector is more consistent with changing geometry through the rotation than with one uniform center-distance setting, but inspection is required to identify the moving part.
- Inference: wheels moving at a verified low idle narrows the problem toward clutch release or bell drag, but idle calibration and vehicle design still need checking.
- Unknown: no universal paper thickness, axial-play value, spring rate, shoe material, tooth count, thread-lock grade or bearing lubricant applies to every nitro RC drivetrain.
Frequently asked questions
How much play should there be between a nitro clutch bell and spur gear?
Use the exact vehicle manual. The gears normally need slight backlash and free rotation without binding, but the approved gauge or paper thickness differs among manufacturers and models. Check the full revolution, not one position.
Why does my nitro RC car move at idle?
First verify that idle speed and linkage are correct. If the idle is correct, stop the engine and inspect for broken or incorrectly installed clutch springs, dragging shoes, bell contamination, incorrect shimming or a binding clutch-bell bearing.
Can I replace a plastic spur gear with a metal one?
Only when the vehicle maker supports the conversion and specifies the matching bell, pitch, slipper and setup. A metal gear does not fix a moving engine mount, bearing play, wrong pitch or driveline binding and may transfer damage to more expensive components.
Should the clutch bell spin freely when the engine is off?
On a conventional centrifugal clutch with the shoes released, the bell should rotate according to the model's service check without gritty feel, sticking or visible wobble. Exact axial play and retention depend on the clutch design.
Why did a new spur gear strip immediately?
Common branches include wrong pitch, excessive backlash, a damaged clutch-bell gear, engine-mount movement, off-axis alignment, bearing play, eccentric gears or downstream binding. Preserve the wear pattern and diagnose before fitting another gear.
Can I use the paper method on every RC gear mesh?
No. It is valid only where the manufacturer approves it, and even then it is an initial setting. Use the specified paper or gauge, tighten the mount without twisting it, remove the paper and verify consistent free rotation through the complete gear cycle.
Conclusion
A reliable nitro clutch diagnosis follows the torque path rather than replacing the most visible broken part. Confirm safe clutch release, sound bell bearings, compatible gears, stable parallel axes and a free driven system. Set mesh by the exact manual and check every tooth position. If the bell wobbles, the mount moves, the part numbers are unknown or the drivetrain binds, stop and resolve that evidence before applying engine power.
References
- Traxxas Support - How Do I Set the Gear Mesh on My Traxxas Model?
- Traxxas Support - Spur Gear Replacement Instructions for T-Maxx
- HPI Racing - Maintenance Guide: Bearings and Gear Mesh
- Team Associated - RC8B4.2 Nitro Instruction Manual
- Losi - Speed-NT Owner's Manual
- SKF Evolution - Bearing Damage Analysis and ISO 15243
Leave a comment