

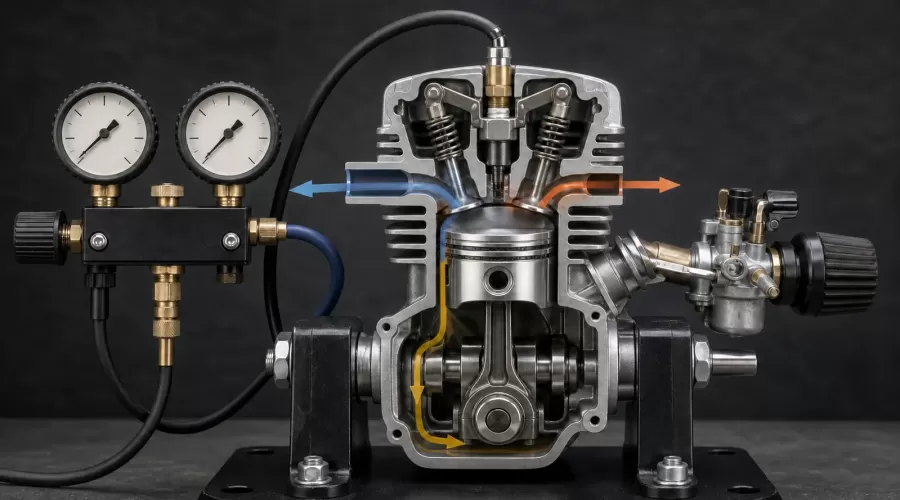
Quick answer: A model engine compression test is not a pass/fail test based on one universal PSI number. Cranking speed, throttle position, temperature, lubrication, valve timing, an automatic compression-release device, gauge volume, and the engine’s own design can all change the reading. Use the manufacturer’s procedure first, repeat the test under controlled conditions, compare cylinders or previous readings when possible, and use a leak-down test to locate leakage before blaming rings, valves, or the head seal.
The key rule is simple: a pressure number is useful only when the test conditions are controlled and the engine’s own manual gives you a valid comparison. Without those two things, the result is evidence, not a verdict.
Key takeaways
- Compression ratio, cranking compression, and cylinder leak-down describe different things.
- There is no defensible universal “good PSI” value for every miniature gasoline, glow, or spark-ignition model engine.
- A low gauge reading can be caused by test method, valve lash, valve timing, an automatic compression release, poor sealing, or slow cranking.
- A leak-down test is usually better than a compression gauge for locating whether air escapes through the intake, exhaust, crankcase, or a sealing joint.
- Do not disassemble a small engine until basic fuel, ignition, valve-motion, and test-repeatability checks are complete.
Three terms that should not be confused
Compression ratio
Compression ratio is a geometric relationship between cylinder volume at bottom dead center and volume at top dead center. It is a design value. It does not tell you the exact pressure a gauge will record while the engine is being turned by a starter, pull cord, or propeller.
Cranking compression
Cranking compression is the peak pressure captured through the spark-plug opening while the engine is rotated. It is a dynamic result. The reading depends on how much air enters, how fast the piston moves, when the valves close, how well the gauge and adapter seal, and how much gas leaks during the test. Readers who need a refresher on the intake, compression, power, and exhaust sequence can start with our guide to how a miniature four-stroke engine works.
Differential leak-down
A differential leak-down test supplies regulated air to a cylinder positioned at top dead center on the compression stroke and measures leakage across a calibrated restriction. The Lycoming cylinder-compression instruction describes this principle for aircraft engines. The scale, adapters, limits, and safety procedure are engine- and tester-specific, but the diagnostic idea is broadly useful: listen and observe where the air goes.
Why one PSI number can mislead you
The FAA Aviation Maintenance Technician Handbook lists incorrect valve clearance, piston or ring wear, damaged valves, deposits at a valve seat, and early or late valve timing among conditions that affect compression. That list matters because several different faults can create a similar gauge result.
Small engines add another complication. A Kohler service manual warns that some engines use an automatic compression-release mechanism, making a conventional cranking reading difficult to interpret, and recommends leak-down testing as an alternative. The exact Kohler specification in that manual applies only to the covered Kohler models; it must not be copied onto a miniature engine from another maker.
Miniature engines can also have a very small swept volume relative to the internal volume of a tester hose and adapter. A loose adapter, long hose, check valve location, or slow and inconsistent rotation can therefore affect repeatability. That is a reasonable measurement inference, not a universal correction factor. If the engine maker supplies a dedicated adapter or method, use it.
The CONTROL method for a reliable diagnosis
Instead of treating a compression gauge as an oracle, use this seven-part CONTROL framework: Confirm, Obtain, Normalize, Test, Repeat, Observe, Locate.
1. Confirm the symptom before testing
Record what the engine actually does: no start, hard hot start, weak power, uneven exhaust note, one cold cylinder, blow-by, or loss of the normal compression “bounce” when turned by hand. A no-start can still be caused by fuel delivery or ignition. Work through the non-invasive checks in our model-engine no-start guide before assuming internal damage.
2. Obtain the correct manual and baseline
Find the manual for the exact engine model, not a similar-looking engine. Note whether the maker specifies hot or cold testing, throttle position, plug removal, starter method, valve clearance, decompression hardware, or a minimum/differential limit. If no value is published, write unknown. Do not borrow a PSI threshold from a mower, automobile, or aircraft engine.
This model-specific principle is visible in the official O.S. FS-52S manual, which specifies that its valve-clearance check is performed cold and gives a range for that engine family. That source supports the method, not a claim that every miniature four-stroke uses the same clearance.
3. Normalize the test conditions
Disable ignition and fuel according to the manual. Secure the model so it cannot move. Keep hands, clothing, tools, wires, and test hoses away from the propeller, flywheel, shaft, fan, or starter. Use the same battery state, starter method, throttle position, temperature state, adapter, hose, and number of revolutions for every comparison. Never energize an exposed ignition lead or allow a fuel-air charge to fire during testing.
Do not improvise around a rotating propeller. If the manufacturer’s procedure cannot be followed safely with the engine installed, stop and have an experienced technician perform the test.
4. Test cranking compression as a comparison
Install the correct adapter without damaging the plug thread. Rotate the engine using the approved method until the gauge stops rising, then record the value and conditions. On a multi-cylinder engine, test each cylinder using the same setup. Differences between cylinders, or a change from the same engine’s earlier baseline, are usually more meaningful than comparison with an unrelated engine.
5. Repeat before interpreting
Release the gauge and repeat at least once. If readings vary widely, fix the method before diagnosing the engine. Check adapter sealing, gauge reset, battery speed, throttle position, valve motion, and whether the piston is completing comparable cycles. A repeatable low reading is more useful than a single dramatic number.
6. Observe valve motion, lash, and timing
For an overhead-valve four-stroke, verify that both valves close at the correct compression position. Too little clearance can hold a valve off its seat; incorrect timing can also reduce the air trapped before compression. Use the engine’s own lash specification and procedure. Our miniature valve timing and lash guide explains the relationship without substituting for a model-specific manual.
Briggs & Stratton’s troubleshooting guidance likewise identifies valve clearance and combustion-chamber leakage as causes of hard starting and recommends leak-down testing when appropriate.
7. Locate leakage before disassembly
When the manual permits it and the correct regulated tester is available, position the piston at true top dead center on the compression stroke and secure the crankshaft against rotation. Introduce air gradually. High pressure can rotate the crankshaft unexpectedly, so this is not a casual compressed-air experiment.
The Continental TN10-4 differential-pressure guidance and the FAA material both emphasize standardized equipment and procedure. For diagnosis, air heard at the intake suggests intake-valve leakage; air at the exhaust suggests exhaust-valve leakage; air at a crankcase vent suggests ring/cylinder leakage. Bubbles or flow at a sealing joint may indicate a gasket or head seal, but construction varies and the model manual remains controlling.
Compression and leak-down evidence matrix
| Observation | Possible explanation | Next non-destructive check | Do not conclude yet |
|---|---|---|---|
| Low, inconsistent cranking readings | Changing speed, poor adapter seal, throttle position, gauge reset | Standardize and repeat | Do not order rings |
| All cylinders similarly lower than expected | Method, battery speed, temperature, decompression system, wrong reference | Verify manual and equipment | Do not assume uniform wear |
| One cylinder repeatedly lower | Valve sealing, lash, timing, ring/cylinder, local gasket leak | Inspect valve action, then leak-down | PSI alone does not identify the part |
| Air at intake during leak-down | Intake valve not sealing or not fully closed | Confirm compression TDC, lash, seat condition | Do not blame the carburetor first |
| Air at exhaust | Exhaust valve not sealing or not fully closed | Confirm lash, timing, seat condition | Do not blame piston rings first |
| Air at crankcase vent | Ring/cylinder leakage or construction-specific flow path | Compare with manual and other cylinders | Do not infer severity without limits |
| Good sealing but weak running | Fuel mixture, ignition timing, load, exhaust restriction | Return to fuel/ignition diagnosis | Compression is not the whole engine |
What about a “wet” compression test?
On some full-size engines, technicians repeat a cranking test after adding a small, specified amount of oil; a change may help distinguish cylinder-wall/ring sealing from valve leakage. This method is not automatically suitable for every miniature engine. Excess liquid can foul a plug, alter combustion, create hydraulic loading, contaminate the test, or conflict with the maker’s lubrication system.
Use a wet test only when the exact manual permits it and specifies the fluid and quantity. A leak-down test is often more directly informative because it shows the leakage path. Never pour an arbitrary quantity into a tiny cylinder.
How engine design changes the interpretation
| Engine type | Important variable | Best comparison |
|---|---|---|
| Single-cylinder OHV four-stroke | Valve lash and correct compression TDC | Manual specification plus repeat trend |
| Multi-cylinder four-stroke | Equal test conditions across cylinders | Cylinder-to-cylinder spread and history |
| Four-stroke glow engine | Maker-specific valve setting, fuel/oil history, hand feel | Official model manual and prior baseline |
| Two-stroke model engine | Port timing, liner/piston fit, temperature, lubrication | Manufacturer method; avoid four-stroke assumptions |
| Engine with compression release | Release active at cranking speed | Maker-approved leak-down or alternative test |
For readers comparing working kits rather than diagnosing one already owned, the working model engine kits category shows the range of architectures that make a universal PSI threshold impractical. Product pages such as the CISON L4-175 OHV inline-four and CISON LS-52 V8 can help identify cylinder count and valve layout; use their supplied manuals for service limits rather than inferring limits from page photos or marketing copy.
When compression testing belongs in the troubleshooting sequence
- Verify fresh, correct fuel and a clear fuel path.
- Verify ignition or glow-plug function using the maker’s safe procedure.
- Confirm the engine turns freely and valve gear moves as expected.
- Check model-specific valve lash and timing.
- Standardize and repeat cranking compression if the manual supports it.
- Use leak-down to locate leakage before opening the engine.
- Only then decide whether cleaning, adjustment, seal work, or disassembly is justified.
An engine that is still in its first operating period should also be evaluated against the maker’s running-in instructions. Our miniature four-stroke break-in guide explains why load, lubrication, temperature, and trend records matter. If sealing checks are acceptable but the engine runs poorly, continue with the carburetor tuning guide instead of forcing a mechanical diagnosis.
Safety limits
- Follow the exact engine, starter, ignition, and tester manuals.
- Keep fuel away from sparks and hot surfaces; work with ventilation appropriate to the fuel.
- Disable ignition and prevent accidental starting before turning or pressurizing the engine.
- Secure the engine and crankshaft. Regulated air can move a piston and rotate a propeller or shaft suddenly.
- Use adapters that match the plug thread. Do not force a tapered or incorrect fitting into a miniature head.
- Do not exceed the engine or tester pressure limit, and do not invent a pressure when the limit is unknown.
- Stop if the procedure requires exposed rotation, uncertain restraint, damaged threads, fuel leakage, or an unsupported modification.
Frequently asked questions
What PSI should a model engine have?
There is no universal value. Use the exact engine manual, a repeatable baseline from the same engine, and cylinder-to-cylinder comparison where applicable. A number from a different displacement, valve system, fuel type, gauge, or cranking method is not a valid specification.
Can an engine feel like it has compression but still leak?
Yes. Hand resistance is a useful symptom, not a calibrated measurement. Oil film, speed, temperature, valve action, and the person turning the engine affect the feel. Small leakage may still be detectable with a standardized leak-down procedure.
Does low compression always mean worn piston rings?
No. Valve clearance, valve timing, valve-seat leakage, a sealing-joint leak, test speed, an automatic compression release, or poor gauge sealing can produce a low result. Locate the leakage before replacing parts.
Is a leak-down test better than a compression test?
They answer different questions. Cranking compression shows the low-speed pumping result under a defined method. Leak-down is better at locating a static leakage path. Use the procedure and limits specified for the engine and tester.
Should compression be tested hot or cold?
Follow the exact manual. Some procedures specify a warm engine; others use a cold result only as a baseline. Temperature changes clearances, lubrication, and sealing, so hot and cold results should not be compared as though conditions were identical.
Can I use shop air directly in the spark-plug hole?
No. Use an appropriate regulated leak-down tester, correct adapter, secure top-dead-center positioning, and the manufacturer’s procedure. Uncontrolled air can rotate the engine suddenly or exceed component limits.
Conclusion
A model engine compression test becomes useful when it is repeatable, model-specific, and connected to a diagnostic sequence. Record the conditions, compare like with like, check valve motion and timing, and use controlled leak-down evidence to locate the escape path. The most expensive mistake is not a low number; it is replacing internal parts before proving where the cylinder fails to seal.
References
- FAA Aviation Maintenance Technician Handbook — Powerplant, Volume 2
- Lycoming Service Instruction 1191A — Cylinder Compression
- Continental Technical Note TN10-4 — Differential Pressure Compression Check
- Kohler Service Manual 17 690 14 — Compression and Cylinder Leak-Down
- Briggs & Stratton — Small Engine Problem Solving Tips
- O.S. Engines FS-52S Instruction Manual — Valve Clearance Adjustment
Leave a comment