

Quick answer: Choose a model-engine glow plug from the exact engine manual first, then confirm the plug's thread, seat, reach, engine type, fuel range and manufacturer-defined heat range. A plug that glows on a starter battery is not automatically healthy under compression. Replace a plug with a distorted, rough, whitened or contaminated filament, but diagnose repeated failure as evidence of an engine, fuel, mixture, compression, debris or power-supply problem—not as permission to keep fitting hotter or cheaper substitutes.
Key principle: A glow plug is a calibrated heat source, not a universal screw-in consumable. The thread may fit while the heat transfer, element position or operating range is wrong.
How does a model-engine glow plug work?
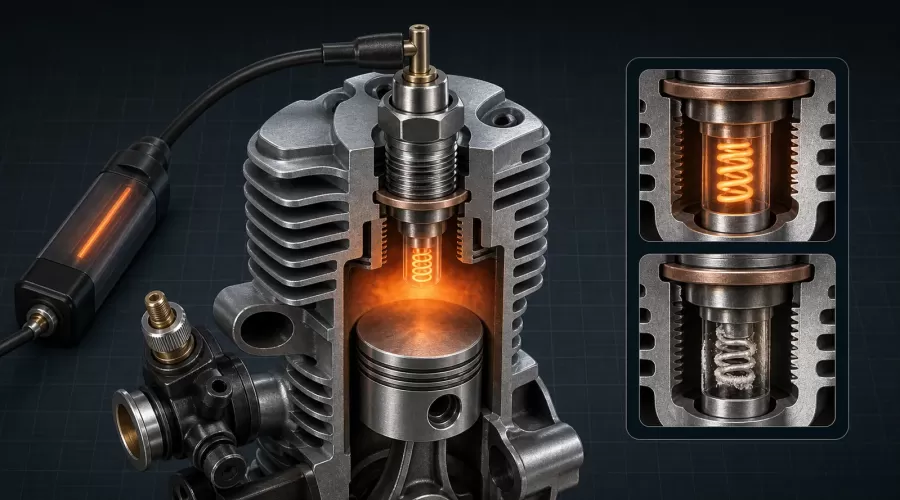
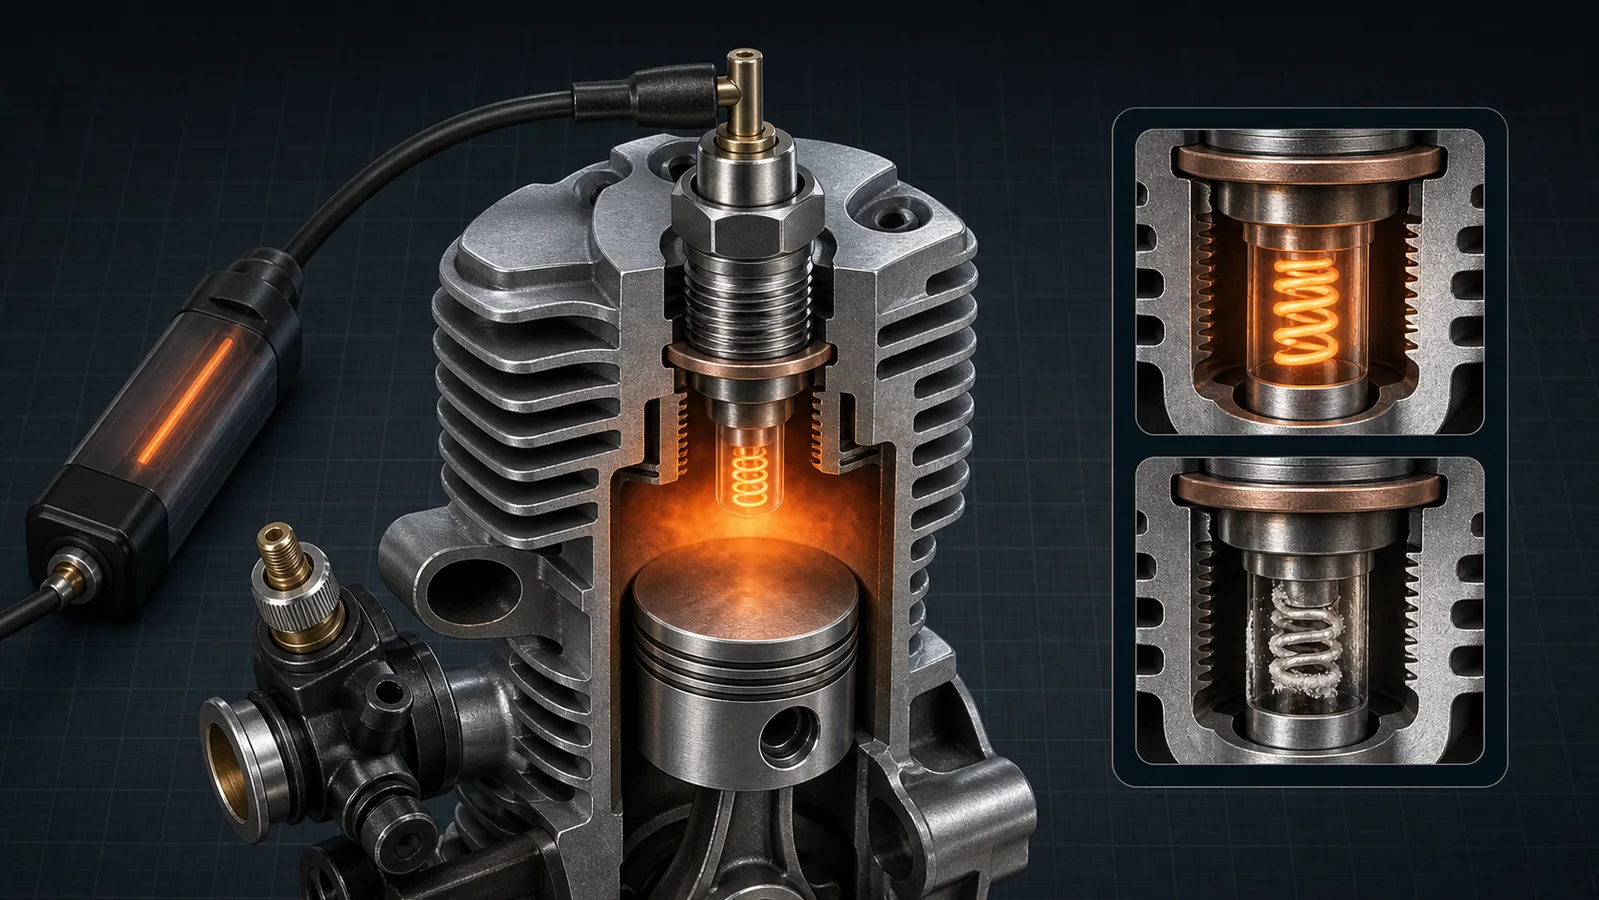
A conventional glow engine has no timed spark for each combustion event. Before starting, a low-voltage igniter heats the plug's small platinum-alloy filament. The hot filament helps ignite the compressed fuel-air charge. After the engine is running, heat from combustion and the catalytic interaction between the filament and methanol help the element remain hot enough for subsequent cycles. The external igniter is then removed unless the exact installation uses an approved onboard-glow system.
O.S. describes a 1.5-volt starting source on its glow-plug technical page, while Kyosho describes a 1.2–1.5-volt starting range in its RC guide. Those are manufacturer instructions, not a reason to connect an arbitrary battery directly. A purpose-built igniter controls the connection and is safer around a rotating propeller, flywheel or starter. Follow the engine and igniter manuals for voltage, connection time and polarity.
The plug performs three related jobs:
- Starting heat: external current brings the filament to operating temperature before the engine can sustain combustion.
- Ignition support: the filament remains a hot reactive surface as pressure, mixture and temperature change through the cycle.
- Combustion-chamber geometry: its reach, element position and heat path are part of the engine design.
This is why a glow plug is not the same as a spark plug or an automotive diesel glow plug. It is also why the unusual O.S. and Enya glow-gasoline products require their own dedicated plugs. Fuel name and ignition method must be verified separately; the nitro versus gasoline model-engine guide explains that distinction.
Four selection gates before buying a glow plug
Do not start with a cross-brand equivalence chart. Start with four gates. A candidate must pass all four before its price or availability matters.
| Gate | What to verify | Why a visual match is insufficient |
|---|---|---|
| 1. Mechanical fit | Thread diameter and pitch, seat/washer, reach, body clearance and wrench access | A plug can screw in yet project too far, seal incorrectly or place the filament in the wrong location |
| 2. Engine architecture | Two-stroke or four-stroke, car/aircraft/boat/helicopter use, standard or turbo-style head, conventional glow or glow-gasoline | Element construction and chamber geometry differ |
| 3. Operating match | Manufacturer heat range, displacement, compression, nitromethane range and intended load | “Hot,” “medium” and “cold” labels are not standardized across every brand |
| 4. Authority | Exact engine manual, maker's current plug chart or written support confirmation | Forum equivalents may omit reach, fuel or revision differences |
O.S. lists A3, No.8, A5, R5 and F for different applications within its own system. Enya lists No.3 through No.6 with its own hot-to-cold descriptions. Those pages prove that heat range and engine use matter; they do not prove that matching words or numbers are cross-brand equivalents. “No.3” from one maker is not automatically equivalent to “No.3” from another.
Four-stroke glow engines often use a plug specified for their longer combustion interval and operating characteristics. Saito's official manuals identify the needed starting equipment and plugs for named engine families. Use that model-specific information rather than assuming that any long-body or “four-cycle” listing is correct.
For EnginesDIY products, the RC engine models category includes different installation chains. A VRX VX18 two-stroke nitro engine, TOYAN FS-L200AC inline-twin nitro kit and SEMTO ST-NF2 twin-cylinder nitro model must each be checked against its supplied engine and current manual. Similar fuel does not make their plugs interchangeable.
What does glow-plug heat range mean?
Heat range describes how the plug manages operating temperature in its intended engine. A “hotter” plug generally retains more heat at the element; a “colder” plug generally transfers heat away more readily. It does not mean that one plug receives more starter voltage, and it does not tell you that the engine itself will run safely at a particular head temperature.
The needed range depends on the complete combustion system: displacement, chamber design, compression, fuel composition, nitromethane content, mixture, ambient conditions, rpm and load. These variables interact. A smaller or lightly loaded engine may need different support from a high-compression racing engine. A four-stroke engine can need a different element arrangement from a two-stroke engine even at similar displacement.
Heat-range changes are not a substitute for correcting the carburetor mixture. If an engine is lean, overheated, over-compressed or receiving the wrong fuel, fitting a colder plug may hide one symptom while leaving the damaging condition in place. Likewise, a hotter plug can improve cold idle in one approved application but create pre-ignition risk in an incompatible one.
Use this decision order:
- Install the exact plug named by the engine maker.
- Use the fuel and nitromethane range named in that manual.
- Return needles, head shims and compression configuration to the documented baseline.
- Only test another heat range when the maker supplies an approved range for the exact engine and conditions.
- Record ambient temperature, fuel, plug code and symptom so the change remains reversible.
How to inspect and test a model-engine glow plug
Let the engine cool, isolate the starter and fuel, and clean loose debris from around the plug before removal. Kyosho explicitly warns against allowing dirt to fall into the engine and against cross-threading a replacement. Use the correct wrench and preserve the sealing washer if the manual calls for one. Never remove a plug from a hot, pressurized or rotating engine.
Visual inspection
O.S. identifies several replacement signs: a roughened or whitened filament surface, a distorted coil, foreign matter on the element, corrosion, deteriorated starting or unreliable idle. A broken filament is an obvious open circuit, but a continuous filament can still be chemically contaminated, mechanically damaged or weak at operating pressure.
Record what you see before cleaning or discarding the plug:
- Clean, even coil: compatible with service, but not proof of correct heat range or performance under compression.
- Wet with raw fuel: evidence that fuel reached the chamber; possible flooding, over-priming, rich mixture or failed ignition.
- White, frosted or rough coil: replace and investigate excessive heat, lean operation, fuel choice or contamination.
- Distorted or compressed coil: replace; investigate mechanical contact, abnormal combustion, compression setup or debris.
- Deposits: replace or follow the maker's service instruction; investigate break-in particles, oil/fuel deposits and air filtration.
External glow test
Use only the correct, charged glow igniter. Hold the plug with an insulated tool or the approved holder, keep fuel vapor away, and energize it only long enough to observe the filament as the manual permits. The coil should heat progressively and evenly. A partial glow, slow response or dark section is reason to replace it. Do not use a high-voltage battery or leave power connected to “burn off” deposits.
This test has a strict limit: it checks continuity and visible heating in open air. It does not reproduce compression, fuel spray, chamber heat, catalytic condition or vibration. A plug can pass on the bench and still fail to support the engine.
Glow-plug symptom and evidence table
| Symptom | What it supports | What it does not prove | Next controlled check |
|---|---|---|---|
| No visible glow | Open plug, weak/empty igniter, dirty connection or wiring fault | That fuel or compression is good | Verify charged approved igniter and connection, then test a specified new plug |
| Glows, but engine will not fire | Open-air continuity is present | Correct heat range, good fuel delivery, compression or mixture | Use the system-level no-start workflow |
| Runs only while igniter is attached | Combustion is not sustaining adequate filament temperature | That the plug alone is at fault | Confirm exact plug, warm-up procedure, mixture, fuel, compression and engine temperature |
| New plugs foul quickly | Repeated contamination or incomplete combustion | That a hotter plug is universally safe | Check break-in status, rich mixture, fuel, air filter and starting technique |
| Filament repeatedly burns/distorts | Excess thermal/mechanical stress or incompatible setup | That plugs are merely low quality | Stop running; inspect mixture, nitro, compression, debris, voltage and specified part |
| Hard hot restart | Temperature-dependent ignition or mixture problem | That a colder plug is required | Record head temperature and repeat only after fuel, cooling and compression checks |
Traxxas notes that a fouled glow plug can contribute to flooding and that break-in particles can foul a plug. Its support material also separates a flooded engine from a new engine tight at top dead center. This supports a symptom-first approach: do not keep energizing the starter when the crankshaft is hydraulically or mechanically locked.
If the plug is wet, use the fuel-system guide to check priming, tank pressure and delivery. If a plug looks overheated or the engine changes when hot, use the cooling and temperature guide. One observation should narrow the next test, not become the whole diagnosis.
Why does a model engine keep burning out glow plugs?
Repeated failure is a stop signal. Possible causes include an excessively lean mixture, too much nitromethane for the engine configuration, wrong heat range, excessive compression, missing or wrong head shims, abnormal combustion, debris striking the coil, a poor air filter, an over-voltage igniter or leaving external power connected too long. The correct list and remedy depend on the exact engine.
Kyosho's X312T manual connects early plug failure and high-nitromethane operation with its named head-gasket configuration. That is a useful example of engine-specific interaction, not a universal instruction to add a shim. Never change chamber volume, head clearance or gasket stack based on another engine's manual.
O.S. warns against running too lean and leaving the battery connected while adjusting the needle. Enya's heat-range table shows that high-speed, high-compression applications may use a colder plug within its product family. Together these sources support a controlled diagnostic rule: restore the named baseline first, then change one approved variable at a time.
After a rebuild or break-in, small particles can temporarily increase fouling. That does not justify ignoring metallic debris. If the coil is mechanically flattened, particles are visible or compression suddenly changes, stop. Inspect the chamber and engine condition before another run. For a newly assembled four-stroke, follow the break-in procedure and exact maker manual.
A controlled glow-plug troubleshooting workflow
- Freeze the configuration. Record engine model, plug code, fuel, nitromethane percentage, ambient temperature, needle baseline, head shims and recent service.
- Make the model safe. Stop the engine, isolate starting power, close fuel, allow cooling, secure the model and clear the rotating plane.
- Inspect before removal. Clean around the plug, photograph the installation, confirm lead routing and look for looseness or leakage.
- Read the removed plug. Note wetness, deposits, corrosion, coil shape and surface. Preserve a failed plug if debris or abnormal combustion may need investigation.
- Verify the igniter. Charge and test the approved igniter according to its manual; do not compensate for a weak source with higher voltage.
- Install the specified plug. Confirm thread, seat, washer and reach. Start by hand to avoid cross-threading and use only the maker's torque method.
- Return to baseline. Use the documented fuel and needle settings. Do not combine a new plug with several simultaneous tuning changes.
- Prime once by the manual. Watch fuel movement and stop before hydraulic lock. If locked, follow the exact flooded-engine procedure with ignition disabled.
- Observe transition off external power. Note rpm, smoke, response and whether removing the igniter causes an immediate or delayed change.
- Stop on repeat failure. A second abnormal plug is stronger evidence of a system fault. Do not consume plugs while guessing.
Facts, inferences, unknowns and safety limits
- Fact: the glow igniter supplies starting heat; a conventional compatible engine should sustain the filament after the igniter is removed.
- Fact: heat-range names and part numbers are manufacturer-specific; a shared word or number does not prove equivalence.
- Reasonable inference: repeated plug damage after installing the specified part points beyond the plug toward operating conditions or engine state.
- Supplier instruction: voltage, fuel, nitro range, plug code, torque, gasket stack and replacement procedure apply to the named model.
- Unknown without controlled testing: whether a visibly glowing plug remains effective under compression, or which system fault caused a damaged coil.
Model fuel is poisonous and flammable; running engines produce heat, noise, moving parts and carbon monoxide. Work outdoors or in the ventilation specified by the manufacturer, wear eye protection, restrain the model and keep people, tools, loose leads and clothing away from a propeller, flywheel, belt, clutch or starter. Never touch a hot plug, test it near spilled fuel, lean over the rotating plane or use fingers to start a propeller.
Do not clean a plug with aggressive abrasives, bend a filament back into shape, substitute a spark plug, alter compression or connect an unregulated battery unless the exact manufacturer instruction permits it. When the manual is missing, obtain it or ask the engine maker. “Unknown” is safer than a confident universal replacement.
Frequently asked questions
Should a glow plug be bright orange?
It should heat progressively and evenly with the approved charged igniter, but visible brightness depends on lighting, plug design and power source. Open-air brightness does not prove that the plug is correct or healthy under compression.
Why does my glow engine stop when I remove the igniter?
The plug may be wrong, fouled or weak, but the engine may also be too rich, too cold, under-compressed or using incompatible fuel. Confirm the exact plug and documented baseline before tuning.
Can I replace a medium plug with a hot plug?
Only when the exact engine maker approves both ranges for the stated fuel and conditions. “Medium” and “hot” are not universal cross-brand specifications.
Does a wet glow plug mean the engine is flooded?
It proves liquid fuel reached the plug. Flooding, over-priming or a rich condition are possibilities, but the observation alone does not quantify fuel in the crankcase or cylinder.
How often should I replace a glow plug?
Use the engine maker's inspection and replacement guidance. Replace it when the filament is broken, distorted, rough, whitened, contaminated or when starting/idle performance deteriorates after other basics pass.
Are glow plugs interchangeable between two-stroke and four-stroke engines?
Not by default. Some manufacturers specify different plugs, element designs or reaches. Use the exact engine manual or written maker confirmation.
Conclusion
A reliable glow-plug decision begins with identity, not heat-range folklore. Confirm the exact engine and mechanical fit, use its approved fuel and plug, inspect the filament as evidence, and test the complete starting system before changing tune or compression. When plugs fail repeatedly, stop consuming parts and diagnose the operating condition. That approach is safer, more economical and more useful than any universal equivalence chart.
References
- O.S. Engines Glow Plug Selection and Replacement Guide
- O.S. Engines M37SZ-HR Instruction Manual: Facts About Glow Plugs
- Saito Small/Medium Single-Cylinder Four-Stroke Engine Manual
- Traxxas TRX 2.5/3.3 Starting and Tuning Support
- HPI Racing: HPI Power Plugs and Glow-Ignition Explanation
- Enya Model Engine Glow Plug Catalogue and Heat Ranges
- Kyosho RC Guide: Glow Engine, Plug and Starting Equipment
- Kyosho X312T Engine Instruction Manual
To compare operating methods and assembly levels after diagnosis, browse model engine kits.
Leave a comment